How to Edit Pages Using SiteBuilder Tools
Once you are logged into the admin dashboard, you will have access to edit the content on any page. Some pages, like a gallery, will need to be accessed from the dashboard, though.
You should see a couple buttons that look like these on the top right of your screen. If there is only the 'admin' one, it means that you can't edit from here.

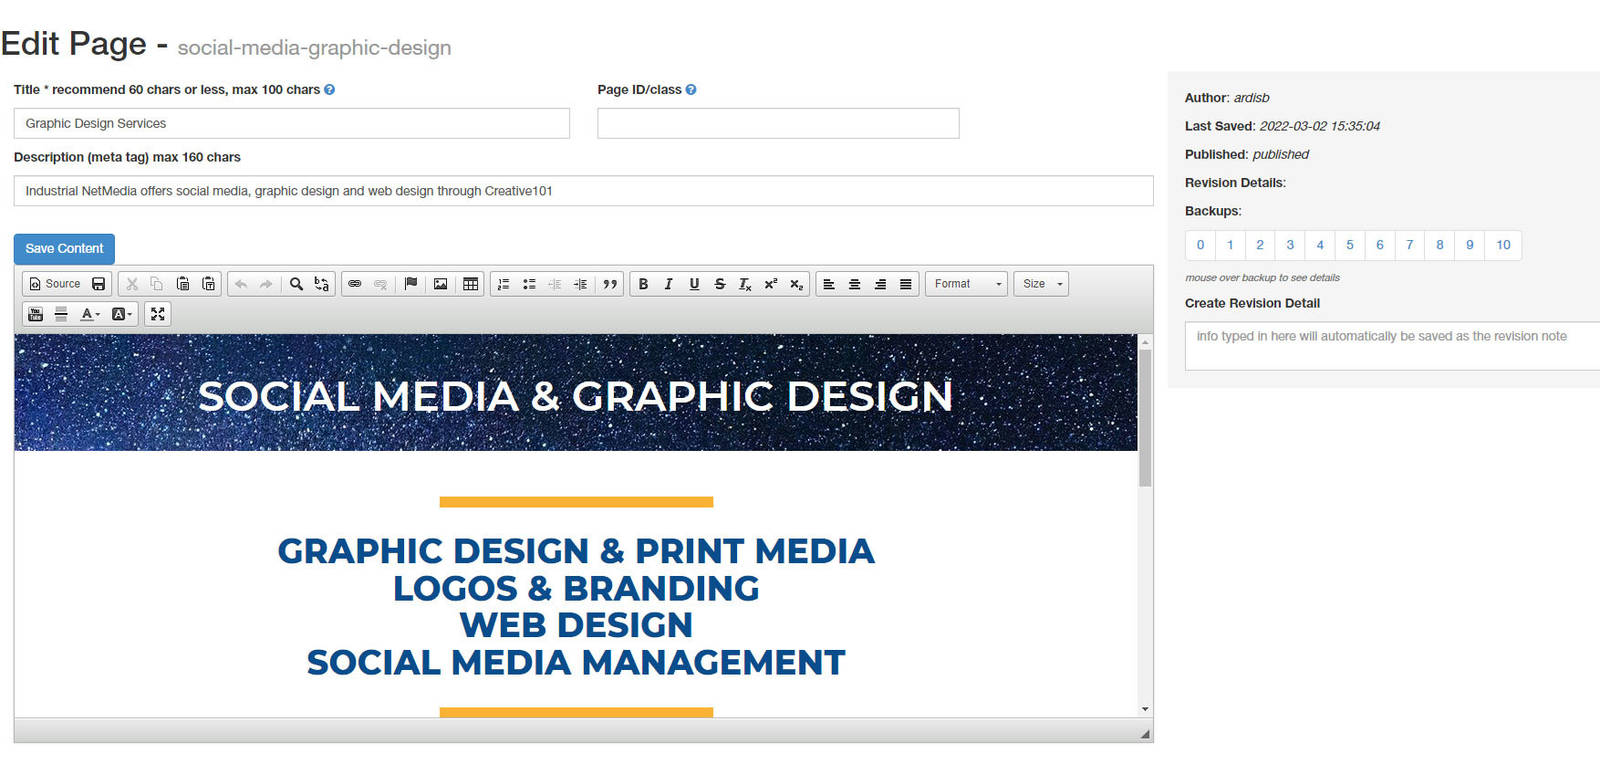
To edit a page, click on the 'edit' button. You will see something like this but obviously, with your content.

As you can see, this part of the Edit Page contains five sections; title, page ID/Class, descriptions, backups and the content area. Let's have a look at each one in more detail.
Title: This field is to put in a title for your page that will be used by Google. Clicking the ? icon will describe the best practises for using this field.
Page ID/Class: This field may or may not be visible, depending on your system authority. It is used for setting the style for a page and is not generally an option our clients will use.
Description: This is an important area to fill out as this is the description google spider-bots use to see if the description matches the contents of the site. The bigger the perceived gap, the less SEO impact it will have.
The tool bar

Save Content: The "SAVE" button. Important tip: save often. Perhaps we should change that a bit... SUPER-DUPER IMPORTANT TIP: SAVE OFTEN! However, as soon as you 'save', it will be on your live site so don't save if you aren't ready.
If you leave the page without saving, all your hard work will be lost and you will cry great seas of tears in proportion to the amount of effort that was wasted.
Here's another important tip: If you save your changes and then access another window to see the changes you'd made to the public view, you must refresh the page (by hitting the F5 key) to see the changes that were made. This is because, when you update a page and save it in the edit system, the page displayed in website mode doesn't automatically update to reveal the changes.
The Source button is for users and administrators who are familiar with the intricacies of HTML code. Pressing this button will show you all the computer gibberish that goes into making your site look the way it does. It is usually not used by the majority of clients.

NOTE: If you are importing text from a Word file or other application, right click and choose 'paste as plain text' first. If you just copy/paste from these apps, it may cause an error due to styling issues. If the text you're pasting has bolding, italics, bullet points or numbered paragraphs, the plain text paster will take those style factors out so it will paste properly. Then the styling can be reapplied once it's in the page editor. This group of buttons allows you to CUT, COPY, PASTE and PASTE AS PLAIN TEXT, depending on the settings in the browser you're using.

The first icon in this group is the "Undo" button. This would be used if you had made a change to a page after saving that you decided you didn't want kept. Pressing the "Undo" icon will take away the change. It will also make the "Redo" button active so you can change your mind and put back the change you took away with the "Undo" button. If only life had these two buttons, eh?
The magnifying glass icon and the a/b icon that follows it are used to "Find" and "Replace" selected text. For example, if you post a long story that contains references to a guy named "Bob" and you discover he prefers being called "Robert". The "Find" button will locate every example of the name "Bob" used in the piece and the "Replace" button will change it to "Robert".
These icons explain how to link other website pages to your own, how to break those links and how to apply anchors to make page navigation easier for your site visitors. The sentence you are reading right now is a link created with the first button. Click anywhere in the previous sentence to go to the page explaining how these three buttons work.

These icons are for images and tables. If you want to place an image, click the 'scene'. To learn more about posting images, click this link.
The other icons is to create a table. To learn more about tables, click this link.
![]()
All of these icons are to edit the content on your page. Very similar to any other formatting application, like Word.

This last set of boxes are for adding a youtube link for a video on your page (learn more here), inserting a horizontal line between text, font colours, background colours and to view the editor in full screen.

